Applies To: ThreatSync
Some of the features described in this topic are only available to participants in the ThreatSync Beta program. If a feature described in this topic is not available in your version of WatchGuard Cloud, it is a beta-only feature.
The Endpoints page provides a centralized list of endpoints and enables Incident Responders to review and perform Isolate Device and Stop Isolating actions for endpoint devices.
To open the ThreatSync Endpoints page, select Monitor > Threats > Endpoints.

Change the Date Range
By default, the endpoints list shows endpoints associated with incidents for the current date. To view endpoints from different dates, you can change the date range.
To filter the endpoint list by date range:
- Click the calendar icon
 .
. - From the drop-down list, select from these time periods:
- Today
- Yesterday
- Last 24 Hours
- Last 7 Days
- Last 14 Days
- This Month
- Last Month
- Custom
- If you select Custom, specify a start and end date for the custom time period, then click Save.
Isolate or Stop Isolation of an Endpoint
You can isolate or stop isolation of one or more endpoints.
To isolate an endpoint:
- Select Monitor > Threats > Endpoints.
The Endpoints page opens. - Select the check box next to one or more endpoints.
The Actions menu appears.
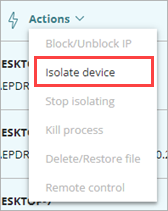
- From the Actions drop-down list, select Isolate Device or, to stop isolation on an endpoint, select Stop Isolating.
The Isolate Device dialog box opens.

- (Optional) In the text box, enter a comment for the isolate action.
- (Optional) If you want to create exceptions to the isolation and allow communications from specific processes, enable Advanced Options.
The Advanced Options and Show Message on Device sections appear in the Isolate Device dialog box.
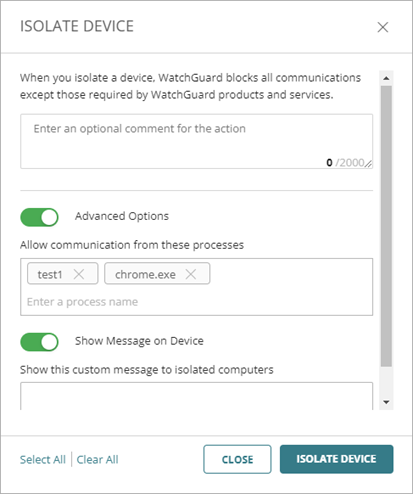
- In the Allow Communication from these Processes text box, enter the names of the processes you want to allow as exceptions to the isolation. For example, enter chrome.exe to allow communications from Google Chrome.
- (Optional) In the Show Message on Device text box, enter a custom message that will appear on isolated computers. If you do not want a message to show on isolated devices, disable Show Message on Device.
- Click Isolate Device.
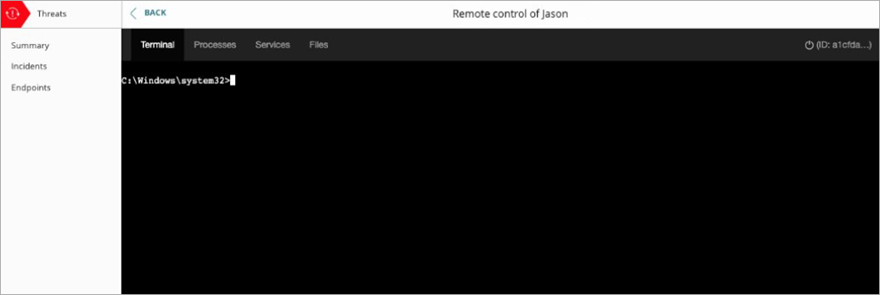
Use Remote Control to Connect to Windows Computers
With the remote control tool, you can remotely connect to the Windows computers on your network from the Endpoints page to investigate and remediate potential attacks.
To use this feature, your remote Windows computers must have:
- An active WatchGuard Advanced EPDR license
- A remote control settings profile assigned in Endpoint Security. For more information, go to Configure Remote Control Settings (Windows Computers).
To start a remote control session, from ThreatSync:
- Select Monitor > Threats > Endpoints.
The Endpoints page opens. - Select the check box next to an endpoint.
The Actions menu appears.

- From the Actions drop-down list, select Remote Control.
The Remote Control window for the computer opens.
For information on how to use remote control, go to Remote Control Terminal — Commands and Parameters (Windows Computers) and About the Remote Control Tool (Windows Computers).